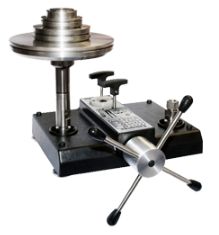
Calibration and repair of Dead Weight Tester
• Calibration should only be carried out when the pressure
balance is in good working order.
• The operation of the pressure balance under calibration
and the pressure reference standard should follow the laboratory’s calibration
procedure and the manufacturer’s technical manual.
• Parameters should be controlled according to the
uncertainty regime, including ambient temperature within 15 °C and 25 °C, and
control of door openings and operator movement.
• Device installation should be done away from air
disturbances, near the standard instrument, and using a rigid, stable table.
• The height difference between reference levels of the two
instruments to be compared should be minimized.
• Respect the verticality of the piston as recommended by
the manufacturer.
• Short, wide-bore pipework should be used, and the
cleanliness and tightness of the tubing should be ensured.
• An appropriate drainage system should be installed to
control the nature of the fluid in the tubing.
• A suitable temperature measurement system should be
attached.
• For gas gauge pressure, use a clean and dry gas at a
temperature near ambient.
• For gas absolute pressure, use a clean pump or an
appropriate trap.
• For liquid pressure, use the liquid recommended by the
manufacturer. If the liquid in the balance under calibration is different from
the standard, use an appropriate interface/separator.
Calibration of Pressure Balances
• The standard pressure reference instrument for calibration
is a pressure balance, with mercury column manometers used for ranges lower
than 300 kPa.
• Calibration of an absolute pressure balance can be carried
out in gauge mode with an added uncertainty in A0.
• Calibration of a pressure balance intended for measuring
negative gauge pressures can be carried out in positive gauge pressure mode
with an added uncertainty in A0.
• The reference instrument must be traceable to a national
standard with a recognized calibration certificate and have an uncertainty
better than the presupposed uncertainty of the balance to be calibrated.
Preparation of the Pressure Balance
• The pressure balance under calibration should be placed in
the laboratory at least 12 hours before the calibration is started to reach
thermal equilibrium.
• The piston-cylinder assembly should be cleaned and
inspected for surface scratches and corrosion.
• The piston-cylinder assembly should be examined for free
rotation time, descent rate, and connection to the standard instrument.
• The reference level for both pressure balances should be
identified and reduced as much as possible.
• For absolute pressure, the difference in height between
the reference level of the standard and the reference level of the balance to
be calibrated should be measured.
• The piston or cylinder should be rotated according to the
manufacturer’s recommendation.
Example of Calibration Procedure
• Both methods are comparative, comparing the balance to be
calibrated and the standard instrument when both are submitted to the same
pressure and environmental conditions.
Method B - Effective Area Determination Method
• The method determines the mass of all weights, including
the piston of the pressure balance, if removable.
• The effective area of the piston-cylinder assembly of the
pressure balance is determined as a function of pressure.
• The repeatability of the measured pressure is estimated
from the experimental standard deviation calculated from successive
determinations.
• The relative uncertainty of mass determination should not
exceed 20% of the likely total measurement uncertainty of the pressure balance
to be calibrated.
• For pressure balances equipped with both low and high
pressure piston-cylinder assemblies or with removable piston-cylinder
assemblies, the complete calibration process should be carried out for each
piston-cylinder assembly.
• The repeatability of the measured pressure is estimated
from the experimental standard deviation calculated from the successive
determinations operated for each pressure point.
• The cross-floating procedure is carried out at each
measuring point when using a pressure balance as a standard instrument.
Calibration of Pressure Balances
• Adjust the pressure to equilibrate the balance under
calibration.
• Perform an adjustment with small weights on one of both
instruments (usually the more sensitive to a change in mass) if method B is
used, or only on the reference pressure balance if method A is used.
• The equilibrium condition should be reached when the
proper falling rate of both pistons is found.
• Note the reference number of each of the weights applied
on both balances.
• Note the temperature of the piston-cylinder assembly of
both balances. If the balance is not equipped with a temperature probe, note
the surrounding air temperature using an electronic thermometer attached to
some suitable point of the balance.
• Alternatively, a differential pressure gauge can be used
which is installed in the pressure line connecting two pressure balances under
comparison.
• A high accuracy pressure gauge can be used if the
measurement range of the gauge should cover the calibration pressure range.
• For each pressure point, adjust the pressure and masses to
equilibrate the pressure balances.
• If the differential pressure is so high that the needed
uncertainty cannot be reached from the calibration of the transducer, repeat
the last five operations.
Absolute Dead weight tester Calibration
• Open bell jars and both valves.
• Place weights on both balances.
• Adjust pressure and masses to equilibrate balances.
• Close and evacuate bell jars.
• Adjust pressure on both sides to equilibrate balances.
• Record pressure gauge reading from reference balance.
• Repeat operations if difference is high.
• Note reference number of weights applied on both balances.
• Note piston-cylinder assembly temperature and surrounding
air temperature if balance isn't equipped with a temperature probe.
• Note residual pressure in bell jar of both balances.
Uncertainty of measurement for dead weight tester
Method A:
• Estimates type A uncertainty (repeatability of the
balance) based on the standard deviation of the pressure difference.
• Type B uncertainty (reference pressure, temperature, head
correction, tilt, spin rate/direction, residual pressure, and limited
cross-floating sensitivity):
• Standard uncertainty for each component is calculated in
accordance with the JCGM 100:2008 (GUM).
Method B:
• Estimates type A uncertainty (repeatability of the
balance) based on the standard deviation of the effective area.
• Estimates type B uncertainty (reference pressure, masses,
temperature, thermal expansion coefficient, air buoyancy, head correction,
surface tension of the pressure-transmitting fluid, tilt, spin rate/direction,
residual pressure):
• Standard uncertainty for each component is calculated in
compliance with the JCGM 100:2008 (GUM).


